 |
 Role Center
incadea Automotive365 Network Management (Publisher) comes with the Role Center:
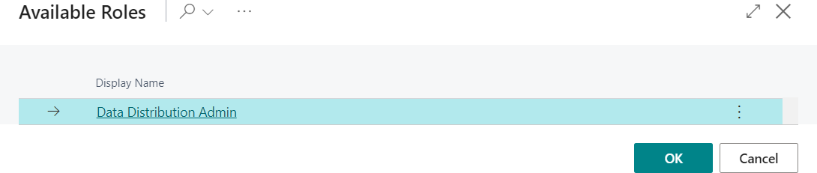
- Data Distribution Admin
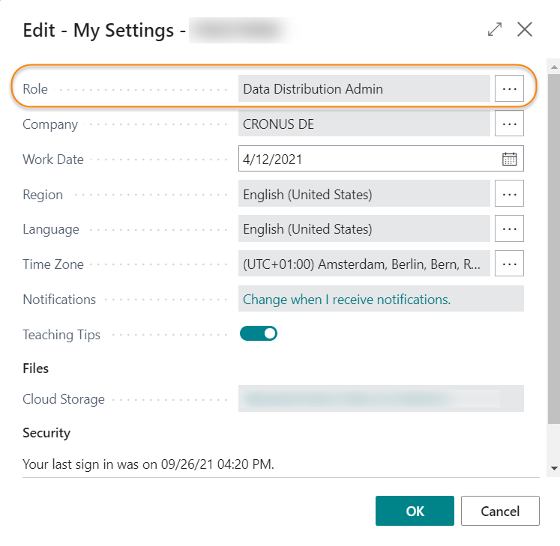
You can select the Role Center by clicking on . For the field Role select the one mentioned above.
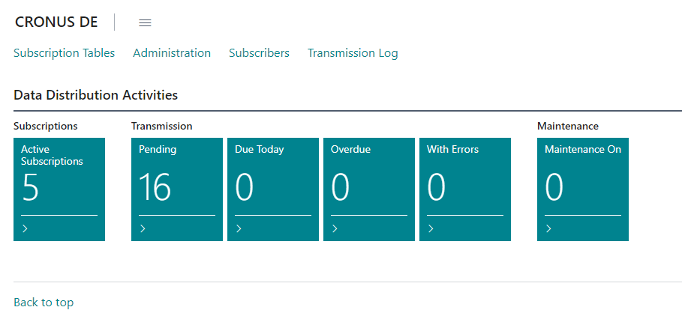
The rolecenter provides quick access to the pages described in the following chapters and gives an overview of the current active Subscriptions, Transmission activity to the subscribers and Maintenance.
In the Transmission section the following Cues are available:
- Pending displays the tables by filter group and subscriber which are pending to download by their respective subscribers according to the Expect next Transmission Until field.
- Due Today displays the tables by filter group and subscriber which are due today for downloading by their respective subscribers according to the Expect Next Transmission Until field.
- Overdue displays the tables by filter group and subscriber which are overdue for downloading by their respective subscribers according to the Expect Next Transmission Until field.
- With Errors displays the tables by filter group and subscriber where an error occured during the downloading/processing by their respective subscribers according to the Status (Last Transmission) field.
Maintenance On displays the tables by filter groups and subscriber that are under maintenance so no related data can be downloaded from those subscribers.
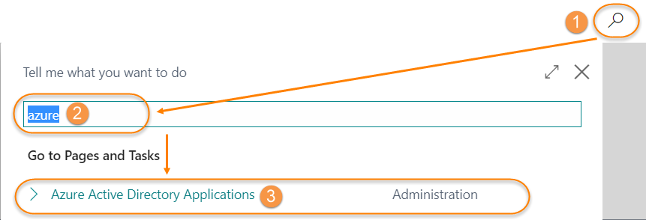
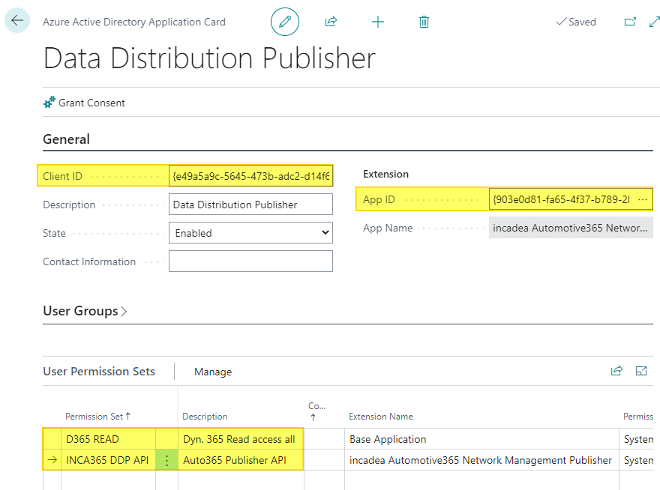
Create the Azure Active Directory Application in Business Central| 1. | Search for Azure Active Directory Applications.
| ||||||
| 2. | Click on + New to add a new record.
| ||||||
| 3. | Enter the Client ID as the Application ID (Client ID) created and copied in Azure Portal in the previous chapter ( ⇘ Register Application in AAD). | ||||||
| 4. | Select the App ID from the list of extensions (incadea Automotive365 Network Management (Publisher)). | ||||||
| 5. | On User Permission Sets select “D365 READ”, which allows the subscriber fetching the data (reading any table) from the publisher and “INCA365 DDP API”, that allows other REST APIs actions like updating the transmission logs. |

 Grant Consent
When the subscriber belongs to another organization or a different environment on Azure, it is necessary to grant the consent in Business Central. To do so, click on Grant Consent on the newly created AAD Application Card.

The user which gives the consent needs to have one of the following roles:
- Global Administrator
- Application Administrator
- Cloud Application Administrator.
Regarding these roles, please check the official Microsoft documentation:
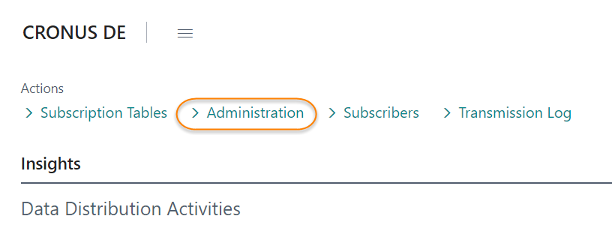
Data Distribution AdministrationThe Data Distribution Administration page is the centralized tool on the publisher to handle the setup of tables and their subscription to the specific subscribers. Moreover, the tool provides additional actions such as:
- Subscriber setup link to another subscriber
- Transmission log per subscriber
- Maintenance Mode.
To open the Data Distribution Administration page, click on Administration on the Role Center.
 Subscription Tables
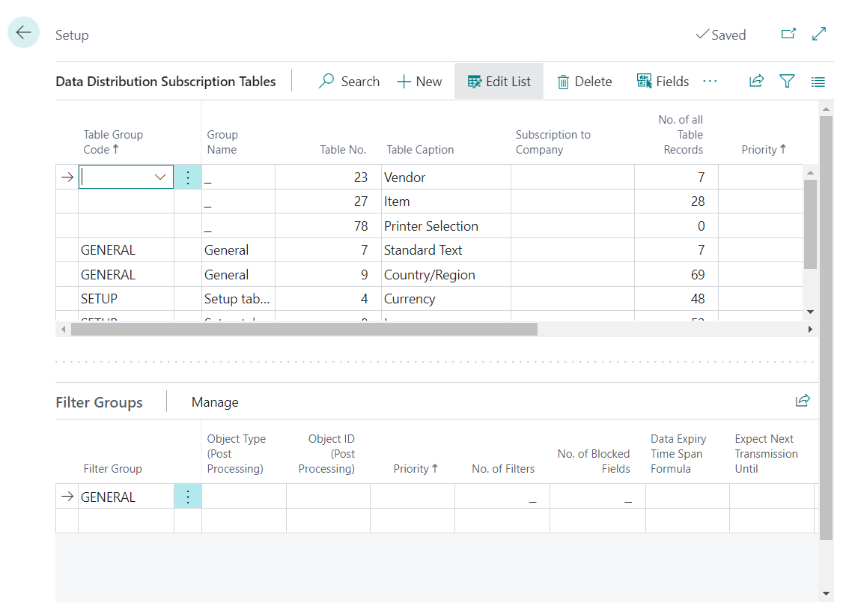
From the Data Distribution Administration the first step should be to setup which tables will be available for subscription. Click on Subscription Tables on the Data Distribution Administration page:

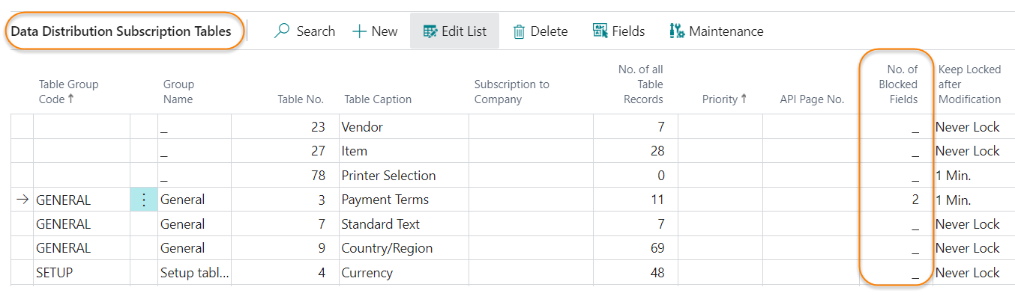
The page Data Distribution Subscription Tables opens:
The records can be created one by one or by clicking on the Assist Edit  of the Table No. field, which allows to select multiple tables to be created.
Each table can have different filter groups. By default, the system creates the “GENERAL” group. In normal conditions this single filter group should be sufficient. A description of the fields is provided below:
Field | Description |
|---|---|
Table Group Code | This field allows to group tables with the same post-processing logic. It works along with the field Priority so that the tables are imported in the subscriber following the sorting by Table Group Code and Priority. 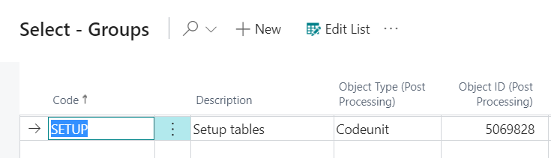 Object Type (Post Processing) can be “Report” or “Codeunit”. In the example on the screenshot above the Codeunit 5069828 will be run on the subscriber once all tables from SETUP group are downloaded and processed. Therefore, the post processing object must exist on the subscriber. |
Group Name | Name of the group related to the Table Group Code |
Table No. | ID of the table. The Assist Edit |
Table Caption | Caption related to the Table No. |
Subscription to Company | Normally will be empty. In case the table is Data per Company it is possible to setup a different company than the one shared with the subscriber if for some reason the data in the publisher for a specific table is not available in the main company. |
No. of all Table Records | Calculated field with the current number of records. |
Priority | Priority of the data import once it is processed in the subscriber. It works along with the field Table Group Code so that the tables are imported following the sorting by Table Group Code and Priority in ascending order so that a table with Priority 1 is imported prior to 2 and so on. |
No. of Blocked Fields | Count of the fields which are blocked in such a way that they are not considered at all when the record is processed in the subscriber or only considered for the insert of the record. |
Keep Locked After Modification | This field is used to keep a lock on the table while this table is being updated in the publisher, e.g. through a batch update of the table for several records or by manual changes on it. The possible options are as follows:
|
Maintenance Mode | The Maintenance Mode can be set/unset manually by clicking on the Maintenance action. |
Blocked FieldsClick on Fields to open the list of fields which are related to the selected table.


As shown on the screenshot above, it is possible to setup the way the field is considered during the update of the data in the subscriber. Thus, there are three options to select on the Subscriber Update:
- IM (Insert/Modify): Is the default value which means that the field will be updated anytime.
- I- (Insert): The field will be updated only when the record is inserted so it will be blocked for modification.
- --: The field will not be updated so it will be completely blocked.
Once any field has any kind of block, either I- or --, it is displayed in the No. of Blocked Fields column:
 Filter Groups
On the Filter Groups FastTab on the Data Distribution Subscription Tables page you can setup different sets of filters for a specific table. Normally is should be sufficient enough with the “GENERAL” group, which is created automatically whenever a table is inserted.

It is possible to add new filters to the “GENERAL” group by clicking on or in the field No. of Filters in the Filter Group Line.

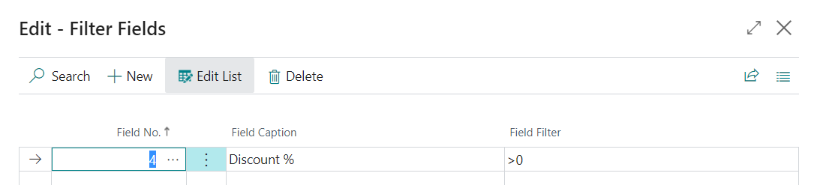
This action opens the Edit - Filter Fields page. In the example below only the records with discount greater then 0 are transmitted.
It is possible to create new filter groups other then “GENERAL” to fulfill more complex scenarios but use this wisely to avoid sending repeating information in different groups.
As it can be seen in the Filter Group - Add Filters screenshot, by clicking on action Fields or on No. of Blocked Fields, it is also possible to set block filters on Filter Group level in the same way it has been shown on table level.
Field | Description |
|---|---|
Filter Group | The lookup of the field leads to a new list page where the filter groups must be created first. Different tables can habe the same filter group, but the set of filters defined depend on each table. The filter group “GENERAL” is created automatically and it cannot be deleted. |
Object Type (Post Processing) | Object Type can be “Codeunit” or “Report”. It works along with Object ID to run (post-process) a routine in the subscriber after the data is updated. If the table has a Table Group Code defined, the default value is copied from the group. |
Object ID (Post Processing) | Object ID works along with Object Type to run (post-process) a routine in the subscriber after the data is updated. If the table has a Table Group Code defined, the default value is copied from the group. |
Priority | Filter Groups can have priority of processing in the same way as it was described for the tables. |
No. of Filters | Count of the number of filters a specific filter group contains. |
No. of Blocked Fields | Count of the fields which are blocked in such a way that they are not considered at all when the record is processed in the subscriber or only considered for the insert of the record. |
Data Expiry Time Span Formula | It is a date formula that specifies a time interval (e.g. 1D, 7D, 15D, 1M, etc) for the transmission so that the next transmission of the data would be carried out based on the formula. This field is also available in the subscriber card (in the publisher extension) and normally it should be set up there (e.g. for all the table subscriptions) but it can also be setup for a specific filter group here. |
Expect Next Transmission Until | This field works along with the field Data Expiry Time Span Formula, so that depending on the interval the next transmission date is calculated. |
Full Table Transmission | The records to be sent to the subscriber for a specific filter group use a timestamp to send only the delta for each transmission. If Full Table Transmission is active, all records without timestamp considerations will be transmitted. This parameter is active by default so the first time the subscriber connects to the publisher it gets all records from the table which fulfill the filter group cirteria. |
Maintenance Mode | The Maintenance Mode can be set/unset manually by clicking on the Maintenance action. |
Maintenance Mode

The Maintenance action is available on the Subscription Tables at the top of the page and on the Filter Groups FastTab. This action sets the maintenance mode in the selected tables and filter groups so that no data is transmitted to the subscribers. There are some ways of selecting the records by clicking on the Maintenance action.

Field | Description |
|---|---|
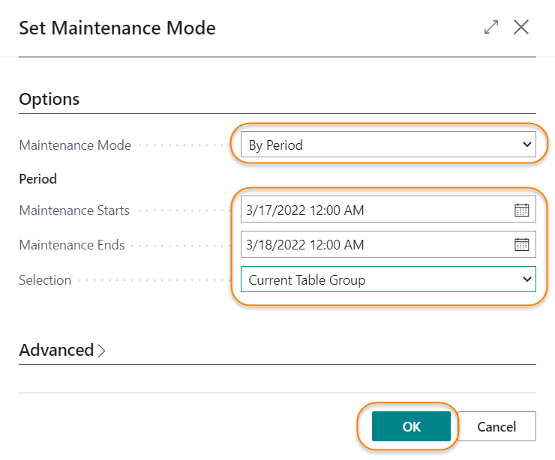
Maintenance Mode | On: to set the Maintenance Mode for the selected records based on Selection option. Off: to unset the Maintenance Mode for the selected records based on Selection option. By Period: to set the Maintenance Mode for the selected records based on Selection option and a time frame based on Maintenance Starts and Maintenance Ends. |
Selection | Current Selection: it will be applied on the selected records. Current Table Group: it will be applied on the records which belong to the Table Group of the selected record. All Records: it will be applied to all records. |
Maintenance Starts | Only visible, if Maintenance Mode is By Period. Sets the starting date and time. |
Maintenance Ends | Only visible, if Maintenance Mode is By Period. Sets the ending date and time. |
Once the Maintenance Mode is set, the user can see its possible value in the field Maintenance Mode of the table or filter group.
The possible values are as follows:
Field | Description |
|---|---|
[On] | Maintenance Mode is set without period until it is set to Off manually. |
[Off] 04/02/22 8:35 AM > 05/03/22 12:00 AM | Maintenance Mode is set within a period, but this period didn't start yet. |
[On] 03/03/22 12:00 AM > 04/03/22 12:00 AM | Maintenance Mode is set within a period and it has started already. |
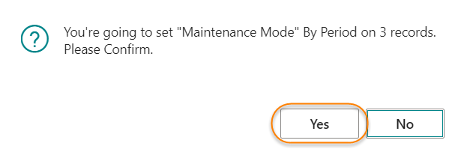
.Example of execution (after clicking on the Maintenance action at the top):
| 1. | Set the values on which the Maintenance Mode should be executed.
| ||||||
| 2. | Click on Yes on the notification.
|

 | Note that when setting the maintenance mode on table level it is automatically copied to the filter groups of that table. As described before, it is still possible to set a different maintenance mode on filter group level if for some reason it is required. But normally it should be sufficient enough with the table level. |
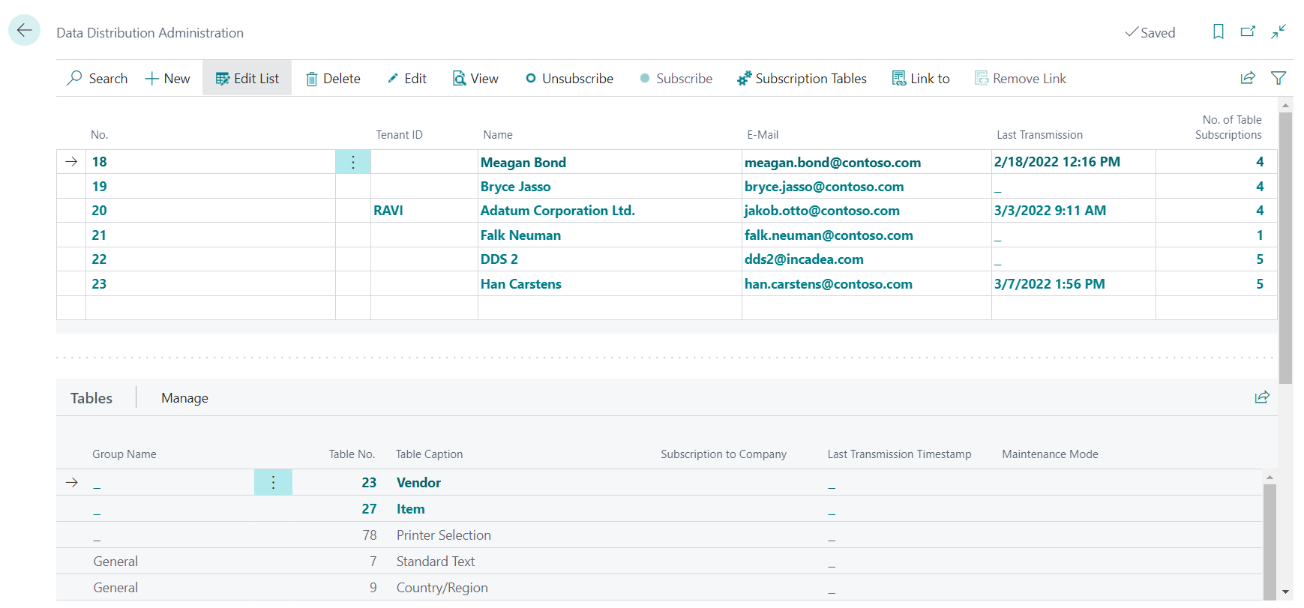
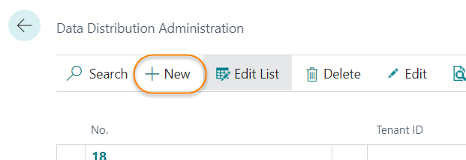
Subscriber CardOnce the setup of the tables has been done as described, it is possible to create some subscribers and subscribe to the tables and filter groups defined in the Subscription Tables page. This is done in the Data Distribution Administration page by clicking on the + new action:
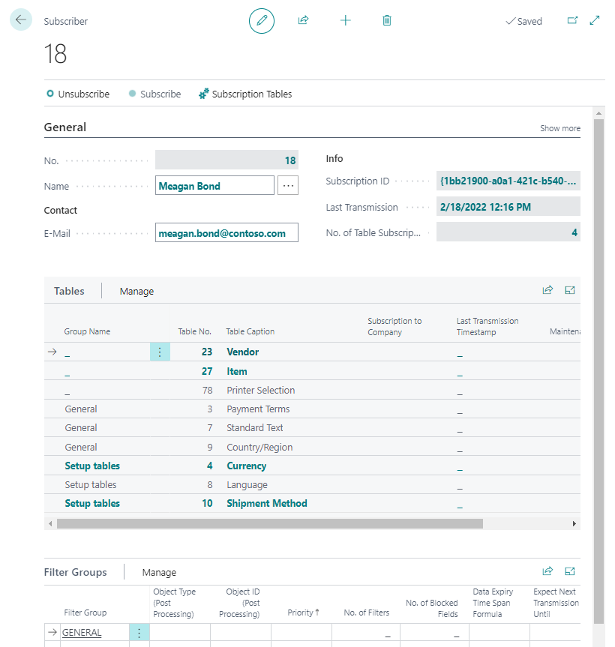
The detailed description of the fields is provided as follows:
Field | Description |
|---|---|
No. | Created by the system automatically. |
Name | This is the contact's name of the subscriber. It can be entered manually or it is also possible to click on the Assist Edit |
Tenant ID | This is the Tenant ID of the subscriber in case of a multi-tenant environment. It is just for information and therefore optional. |
Settings | |
Data Expiry Time Span Formula | It is a Date Formula that specifies a time interval (e.g. 1D, 7D, 15D, 1M, etc.) for the transmission so that the next transmission of the data would be carried out based on the formula. It works along with the Expect Next Transmission Until field on Filter Group level. Displayed when clicking on Show more. |
Start Subscription | Indicates when the subscription starts. It is not mandatory. Displayed when clicking on Show more. |
End Subscription | Indicates when the subscription ends. It is not mandatory but in case it is filled no data will be transmitted after this date. Displayed when clicking on Show more. |
Contact | |
Subscriber Contact No. | Contact No. from the Contact list. It is optional. Displayed when clicking on Show more. |
Email of the contact. When a record is selected from the contact list the email is copied from the contact. | |
Info | |
Subscription ID | Created by the system automatically. This is a very important field to share with the subscriber so that the connection to the publisher can be established. |
Last Connection | The date/time of the last communication from the subscriber according to the transmission log. |
Last Transmission | The date/time of the last transmission from the subscriber according to the transmission log. |
Creation Date | Calculated field with the date of the subscriber creation. |
Last Modification Date | Calculated field with the date of the last subscriber modification. |
No. of Table Subscriptions | Count of table subscriptions. A subscriber can subscribe to all tables or to some of them. |
No. of Completed Transmissions | Count of completed transmissions according to the transmission log. |
Transmission Fees (Invoiced) | In case a Subscription Payment is Per Transfer, it is the sum of fees which are invoiced according to the transmission log. |
Table SubscriptionsOnce the setup of the tables has been carried out in the Table Subscriptions page and a subscriber has been created, the system automatically copies all the available tables and filter groups from the Table Subscriptin page to the subscriber and they all appear as subscribed (bold) in the Data Distribution Administration page (same as in the Subscriber page seen on the screenshot for that page.
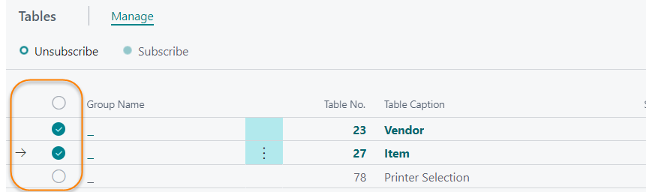
If some tables are not needed by the subscriber, it is possible to select them and use the Unsubscribe action as follows:
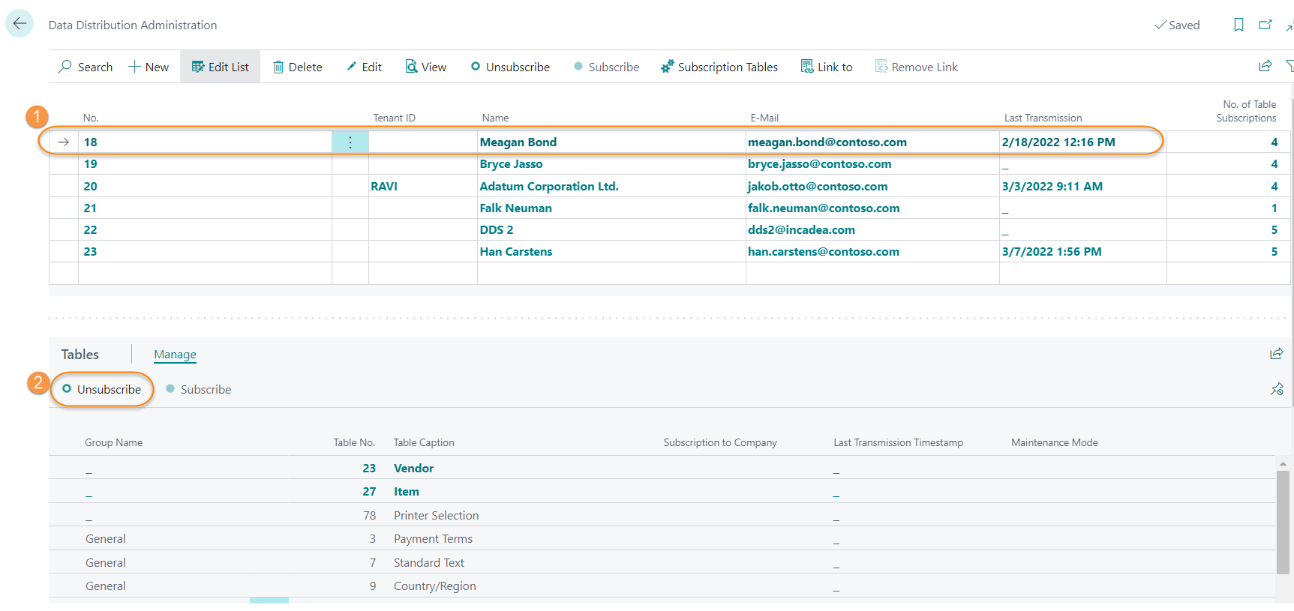
| 1. | On the Data Distribution Administration page, select a subscriber. | ||||
| 2. | In the Tables section of that page select the table, you want to remove from the subscription and click on Unsubscribe. (Subscribed tables are shown in bold).
|
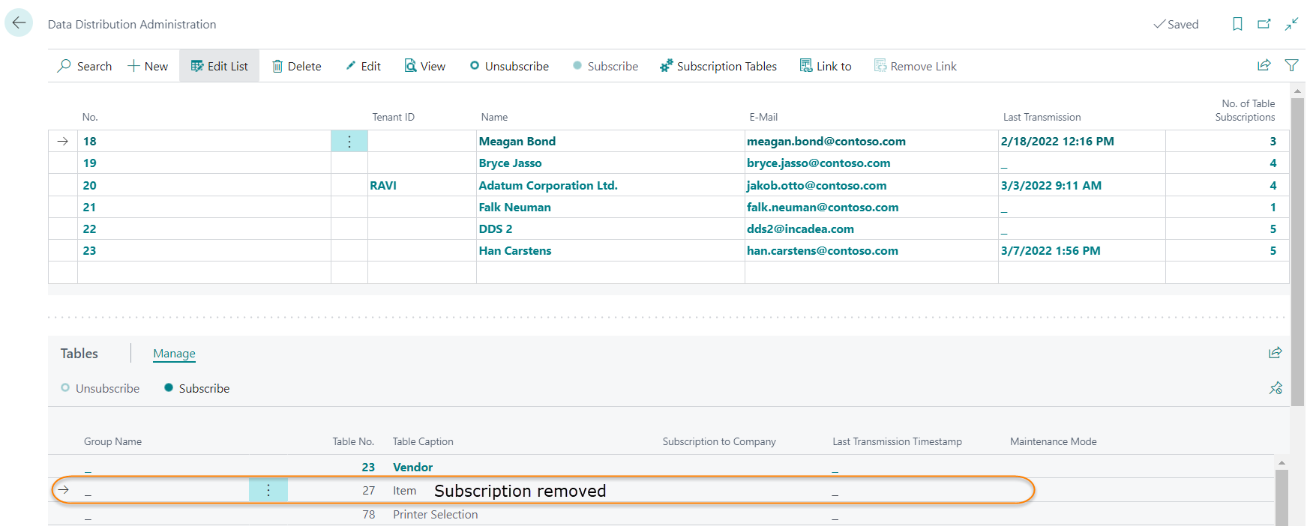
| You can select more than one table by pressing [Ctrl] while clicking at the needed lines. A checkbox on the left side of the list appears, where you can see, which tables are selected. |
The same procedure is applied to the Filter Groups part on that page in case their table is subscribed. If their table is not subscribed, no subscription action is allowed for the Filter Groups part.
| Note that in the Data Distribution Administration it is not possible to modify the tables, filter groups, block fields, set a maintenance mode, etc. These changes must be carried out in the Subscription Tables page as explained in the chapters earlier. As a rule, it is only possible to subscribe or unsubscribe to tables or filter groups. The only exception are some fields related to the transmission that can be changed per subscriber like the Full Table Transmission to e.g. re-send again all the data and the Data Expiry Time Span Formula explained before. |
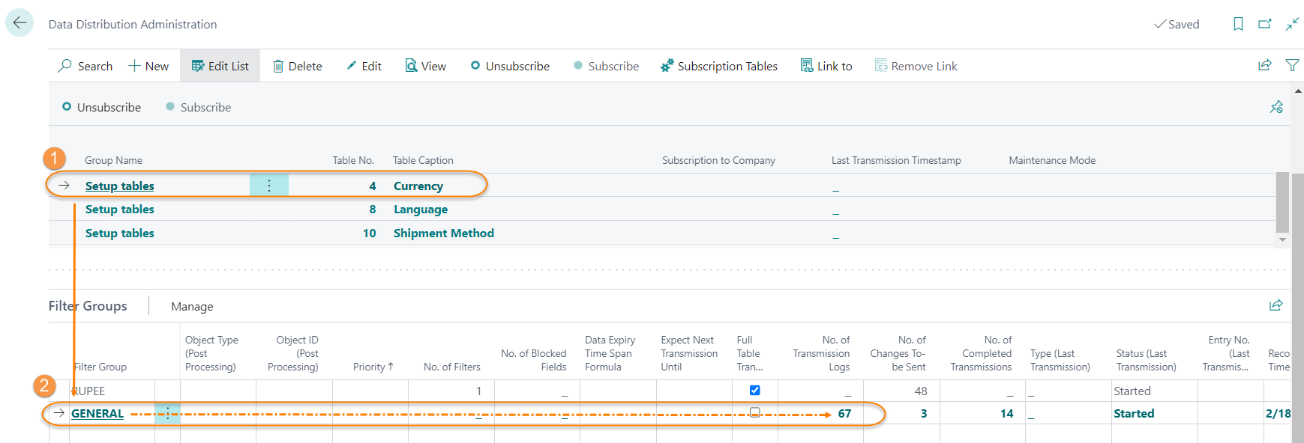
Link to another SubscriberThe Link to action on the Data Distribution Administration page provides a way to sync the setup of one or more subscribers (child) to one subscriber (parent) so that they share a common set of tables and that only the change of the parent subscription is needed instead of changing all subscribers.
| 1. | Select the subscriber (parent) which does have the subscription of tables you need.
| ||||||
| 2. | Click on the Link to action.
| ||||||
| 3. | Select the subscriber(s) (child(ren)) you want to link to the previous selected one (parent) and click OK.
|
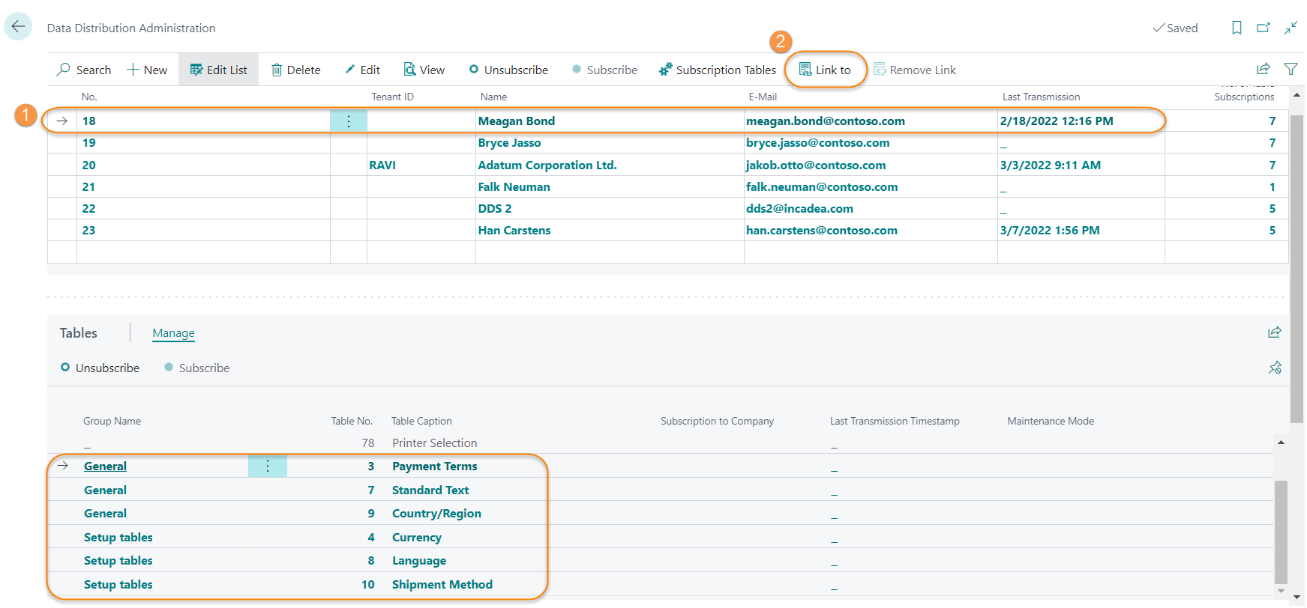
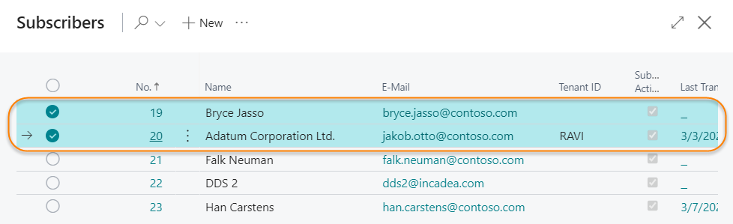

Both subscribers (19+20) are now linked to subscriber 18. They are indented to the right and displayed immediately after the parent subscriber. The No. includes the No. of the parent between brackets, e.g. 19 (18). Moreover, both have now the same count of table subscriptions (7) as its parent which indicates that they have the same set of subscription to tables and filter groups.
Any change on the subscriber 18 (Subscribe/Unsubscribe) on tables will be synched to 19 and 20. This is also applied on Filter Groups level.
While a child is linked to a parent, no change of subscription should be expected in the child. However, in that case it is possible to break the link to the parent by confirming the message in the following screenshot, after clicking Subscribe or Unsubscribe.:
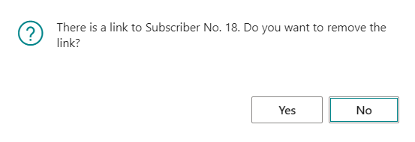
You can also use the action Remove Link to break the link from the selected child subscriber to the parent subscriber:
 Transmission Log
The subscribers connect periodically to the publisher to download and process the data and send information about the status of the process. This information is stored in the transmission log in the publisher.
The Filter Groups at the bottom of the Data Distribution Administration page displays some additional information in terms of the transmission log:
Field | Description |
|---|---|
No. of Transmission Logs | Count of the transmission log records related to the Filter Group for a specific table and subscriber. The lookup leads to the Transmission Log page: 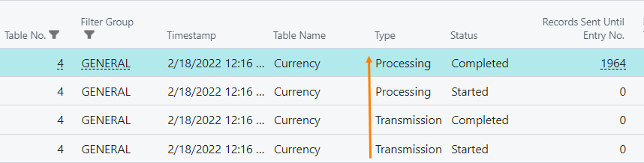 The screenshot above displays the log records which are generated in case of a successful transmission. The possible types are:
|
No. of Completed Transmissions | Similar count as No. of Transmission Logs but filtered by the status “Completed”. |
Type (Last Transmission) | Displays the Type (Transmission, Processing, Post-Processing) of the last transmission. |
Status (Last Transmission) | Displays the Status (Started, Completed, Error) of the last transmission. |
Entry No. (Last Transmission) | Points to the last transmission entry in the Transmission Log. |
Last Transmission Timestamp | Displays the Entry Timestamp of the last transmission. |
Permission SetsThe incadea Automotive365 Network Management (Publisher) app includes the permission sets as follows:
 INCA365 DDP
This is the basic permission set. The aim of this permission set is to provide access to the necessary objects involved in the table data modification detection. Thus, all users must have this permission set assigned since potentially any table can be used by the app to transfer to the subscribers.
When the app is installed, this permission set is assigned to all users automatically. For new users once the app has been installed, the admin must assign the permission set to the new user directly or by including it into a user group.
The basic users do not have access to the Data Distribution Administration or any related logic.
INCA DDP ADMINThis is the admin permission set. The aim of this permission set is to grant admin users access to all functionalities of the app including the Data Distribution Admin Rolecenter. Technically, this permission set includes the basic one INCA365 DDP.
This permission set must be assigned manually by an admin user.
INCA365 DDP APIThis is the permission set used by the Azure Active Directory Application and provides access to the subscribers which conmue the OData REST APIs exposed by the publisher. To assign this permission set please see ⇘ “Create the Azure Active Directory Application in Business Central”.
Technically, this permission set includes the basic one INCA365 DDP.