 |
 How to install incadea Automotive365 Aftersales
| 1. | Install the app from https://appsource.microsoft.com/en-us/marketplace/apps?product=dynamics-365-business-central or Search for Extension Management and on the page Installed Extensions, click , where you can then search for the extension.
| ||
| 2. | The permission set should be assigned to the users, who will work with this app. |

 | A RapidStart Package, which sets up default values, can be run by your IT department or requested by us if needed. |
| Install the Base app along with the Aftersales app to get the complete vehicle records. |
Role Centersincadea Automotive365 Aftersales operates with three Role Centers:
- Aftersales Backoffice
- Aftersales Manager and
- Aftersales Parts Manager
The Aftersales Manager Rolecenter is showing KPIs and links to report. The focus in this Rolecenter is on Amounts.
The Aftersales Backoffice Rolecenter is more action driven. Here the processes for aftersales activities are done.
The Aftersales Parts Manager Rolecenter shows the demands for parts from the workshop, parts reservations and organize picking for workshops.
You can select the Role Center by clicking on . For the field Role Center select the one of the mentioned above.

① Aftersales Navigation Menu
② Aftersales Navigation Bar
③ Aftersales Reports
④ Aftersales Headline
⑤ Aftersales Totals
⑥ Aftersales Activity Cues

① Aftersales Navigation Menu
② Aftersales Navigation Bar
③ Notification Pending Documents
④ Aftersales Reports
⑤ Aftersales Headline
⑥ Aftersales Activity Cues
① Aftersales Navigation Menu
② Aftersales Navigation Bar
③ Aftersales Reports
④ Aftersales Headline
⑤ Aftersales Activity Cues
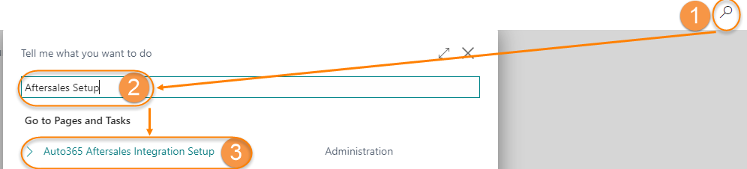
Setup.Open Setup Page
| 1. | The Setup page can be opened either by using the Search Button and calling the page directly or by calling the Service Connections page and selecting the Aftersales Integration Setup
|

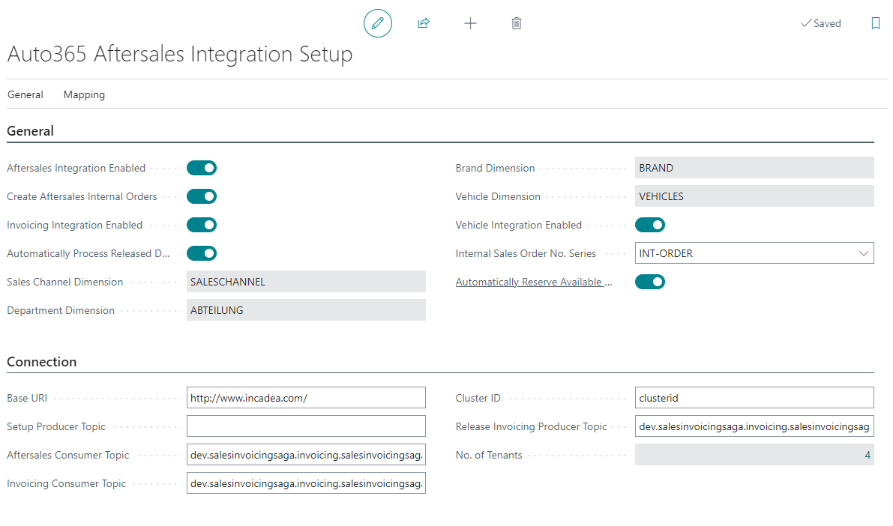
.General FastTab
| 1. | Activate Aftersales Integration Enabled. This field indicates, if the integration for the aftersales transactions is enabled. This also activates the field Vehicle Integration Enabled. |
| 2. | Activate Create Aftersales Internal Orders if internal orders will be used for posting of inventory items. |
| 3. | Activate Invoicing Integration Enabled. By activating this field, the integration of aftersales documents to be posted is enabled. |
| 4. | Automatically Process Released Documents. If this field is activated, all release documents are proccessed by the system automatically. Also a new Job Queue Entry is created. If the field is not activated, all released documents need to be processed manually. |
| 5. | Select “Saleschannel” for the field Sales Channel Dimension. |
| 6. | Select “Department” for the field Department Dimension. |
| 7. | Select “Brand” for the field Brand Dimension. |
| 8. | Select “Vehicles” for the field Vehicle Dimension. |
| 9. | Activate Vehicle Integration Enabled (if not activated automatically by enabling the aftersales integration). By activating this field vehicles, which are involved in a posted document, are automatically created. |
| 10. | Select the No. Series for the field Internal Sales Order No. Series, e.g. INT-ORDER. |
| 11. | Activate Automatically Reserve Available Quantities, if an automatic reservation for parts on an internal order should be performed. |
| The values, which you have selected for setup 4-7 are only example ones. You can select any Dimension Code you want to, since there is no "pre-defined" value to select. Butyou have to make sure, that each field is assigned to a unique Dimension Code. |
As for the Connection FastTab, enter the following information (this connection setup is also used for pushing the setup tables):
 | The information for Connection has to be entered by a e.g. system administrator, since this information is more technical. |
| 1. | In the field Base URl enter the URL for the Connection link, e.g. http://www.incadea-url.com. |
| 2. | In the field Setup Producer Topic enter the respective value, e.g. producer_topic. |
| 3. | In the field Aftersales Consumer Topic enter the respective value, e.g. consumer_topic. This field is mandatory, if the Aftersales Integration is set to “active”. |
| 4. | In the field Invoicing Consumer Topic enter the respective value. This field is mandatory, if the Invoicing Integration is set to “active”. |
| 5. | The field Cluster ID specifies the cluster ID, which is required for sending messages. It is mandatory, if the Invoicing Integration is set to “active”. |
| 6. | In the field Release Invoicing Producer Topic enter the respective value. This field is mandatory, if the Invoicing Integration is set to “active”. |
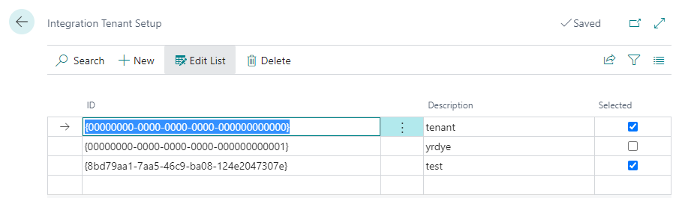
| 7. | The field No. of Tenants shows the No. of Tenants, which are
selected for the connection. This field must not be zero, when
any kind of integration is enabled. It also works as a lookup
field on the integration tenant setup. |
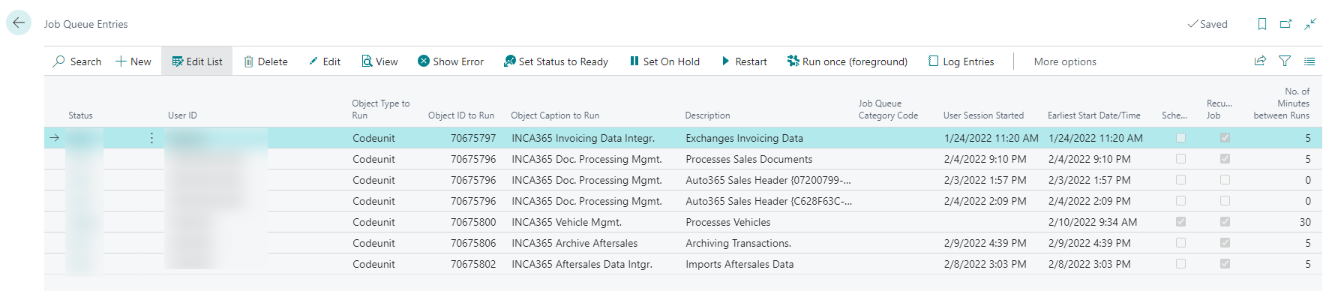
| When Vehicle Integration Enabled is activated, there is also a job queue created, which is responsible for creating a vehicle entry and vehicle ledger entries (Codeunit 70675800 INCA365 Vehicle Mgmt.). When Aftersales Integration Enabled is activated, a job queue is created, which is responsible for importing the aftersales data (Codeunit 70675802 INCA365 Aftersales Data Integr.). Also a job queue for archiving activity jobs es created (Codeunit 70675806 INCA365 Archive Aftersales). When Invoicing Integration Enabled is activated, the system verifies that both Base URL and Invoicing Consumer Topic fields are not empty and creates a new job queue in order to periodically exchange data (Codeunit 70675797 INCA365 Invoicing Data Integr.). When Automatically Process Released Documents is enabled, a new job queue is created in order to process the pending records (Codeunit 70675796 INCA365 Doc. Processing Mgmt.). You can check these job queue entries by clicking on Job Queue Entries on the General FastTab on the setup page. |
 Additional Setups
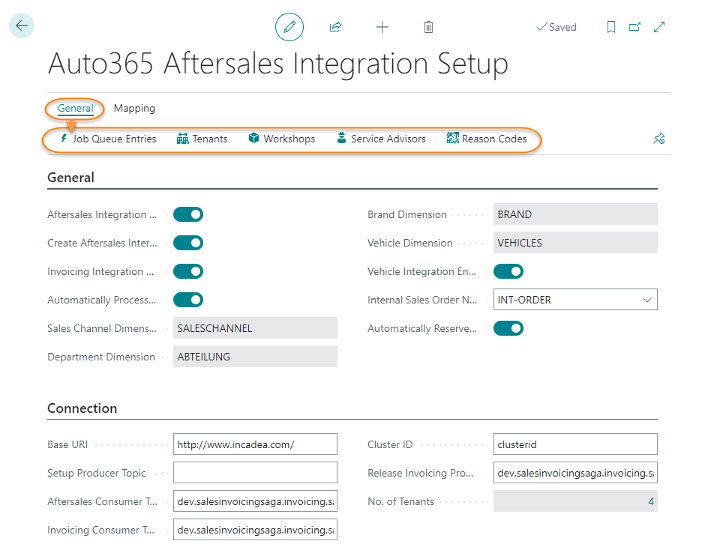
| 1. | Click on the Tenants entry on the menu.
|
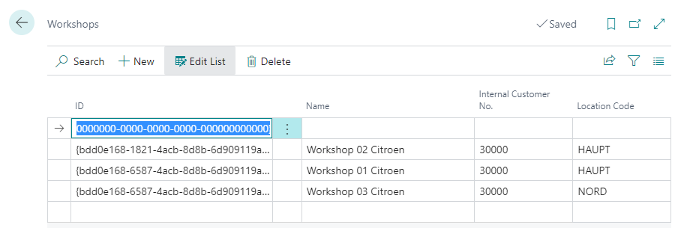
| 1. | Click on the Workshops entry on the menu.
|
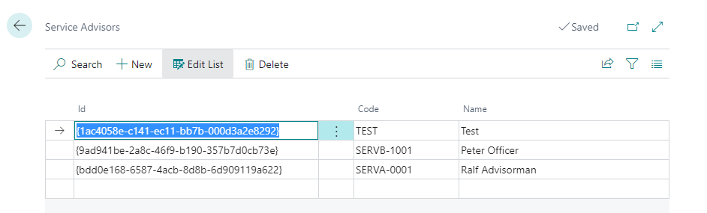
| 1. | Click on the Service Advisors entry on the menu.
|
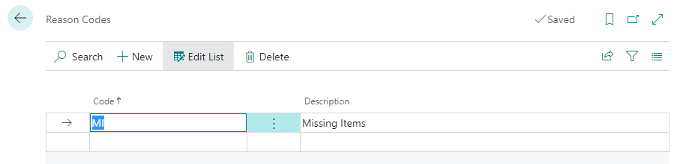
| 1. | Click on the Reason Codes entry on the menu.
|
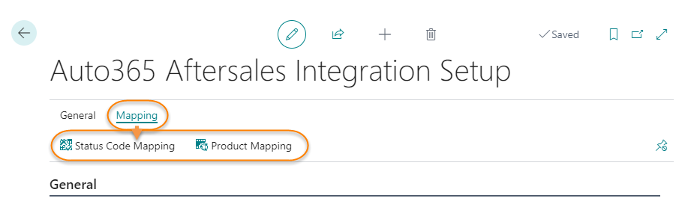
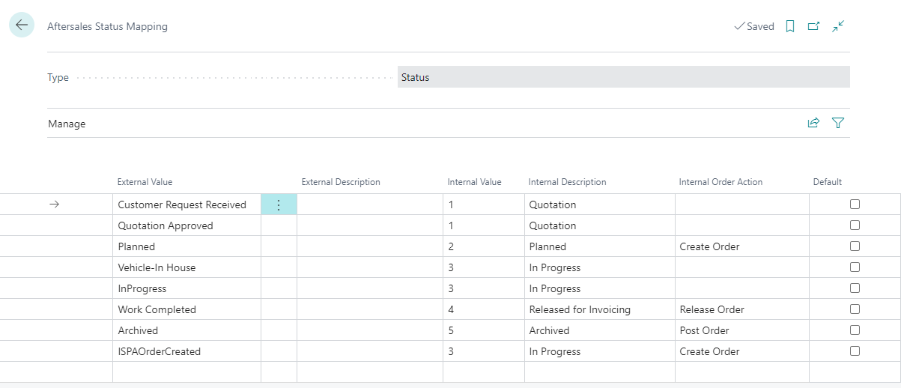
| 1. | Click on the Status Code Mapping entry on the menu.
|
| 1. | Click on the Product Mapping entry on the menu.
|
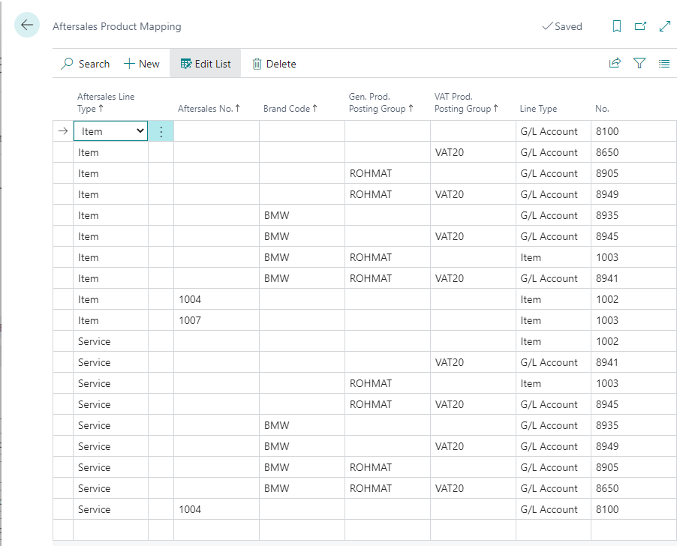
Aftersales Product Mapping is mandatory for inventory items in case Create Aftersales Internal Orders is enabled so that item ledger entries are not posted twice, once via internal orders and once via posting of the customer invoice. Otherwise, this setup is optional and used only when users wish to replace product codes used in aftersales document and actual BC documents posted.
- Aftersales Line Type: Specifies the sourse aftersales line type which needs to be mapped. You can select between “Item” and “Service”.
- Aftersales No.: Specifies the soure aftersales product no. which needs to be mapped. This field is optional and only needed when the mapping is assigned per Item or Service No.
- Brand Code: Specifies the brand code of aftersales lines to be used as a criterion for group mapping.
- Gen. Prod. Posting Group: Specifies the Gen. Prod. Posting Group of aftersales lines to be used as a criterion for group mapping.
- VAT Prod. Posting Group: Specifies the VAT Prod. Posting Group of aftersales lines to be used as a criterion for group mapping.
- Line Type: Speficies the line type to be used on the BC sales documents to be created. Choose either “G/L Account” or “Item”.
- No.: Specifies the no. to be used on the BC sales documents to be created.
| The criteria fields are all optional (except the field Aftersales Line Type which is mandatory). The most specific has priority over a generic one. This means, the more information is filled in this mapping the more priority it gets for creating invoices. |
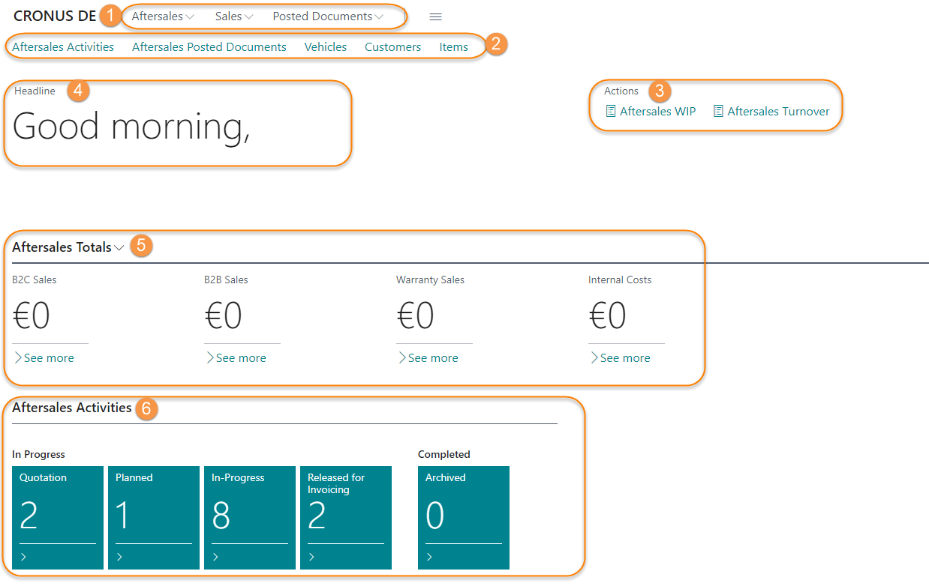
Aftersales Manager RC① Aftersales Navigation Menu
② Aftersales Navigation Bar
③ Aftersales Reports
④ Aftersales Headline
⑤ Aftersales Totals
⑥ Aftersales Activity Cues
The Aftersales Manager Rolecenter is showing KPIs and links to reports. The focus in this Rolecenter is on amounts.
On Reports you have access to Aftersales WIP and Aftersales Turnover:
- The Aftersales WIP report shows the expected value of aftersales activities in progess but which are not finalized yet. The work in progress is shown in a matrix layout, split by branch, customer type and type of sales.
- The Aftersales Turnover report shows a breakdown of the revenues of the aftersales area in a matrix layout, split by branch, customer type and type of sales.
For a detailed description of the reports, please see ⇘ Reports.
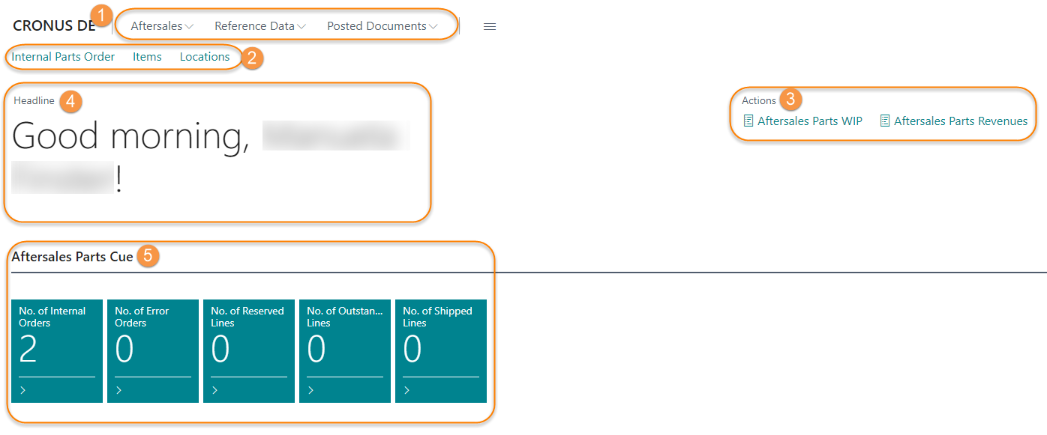
Aftersales Parts Manager RC① Aftersales Navigation Menu
② Aftersales Navigation Bar
③ Aftersales Reports
④ Aftersales Headline
⑤ Aftersales Activity Cues
The Aftersales Parts Manager Rolecenter is showing activity information to internal orders, item reservations, shipping and links to reports.
On Reports you have access to Aftersales Parts WIP and Aftersales Parts Revenues:
- The Aftersales Parts WIP report shows the expected value of aftersales parts activities in progess but which are not finalized yet. T
- The Aftersales Parts Revenues report shows a breakdown of the revenues of the aftersales parts area.
For a detailed description of the reports, please see ⇘ Reports.